
Shuttles
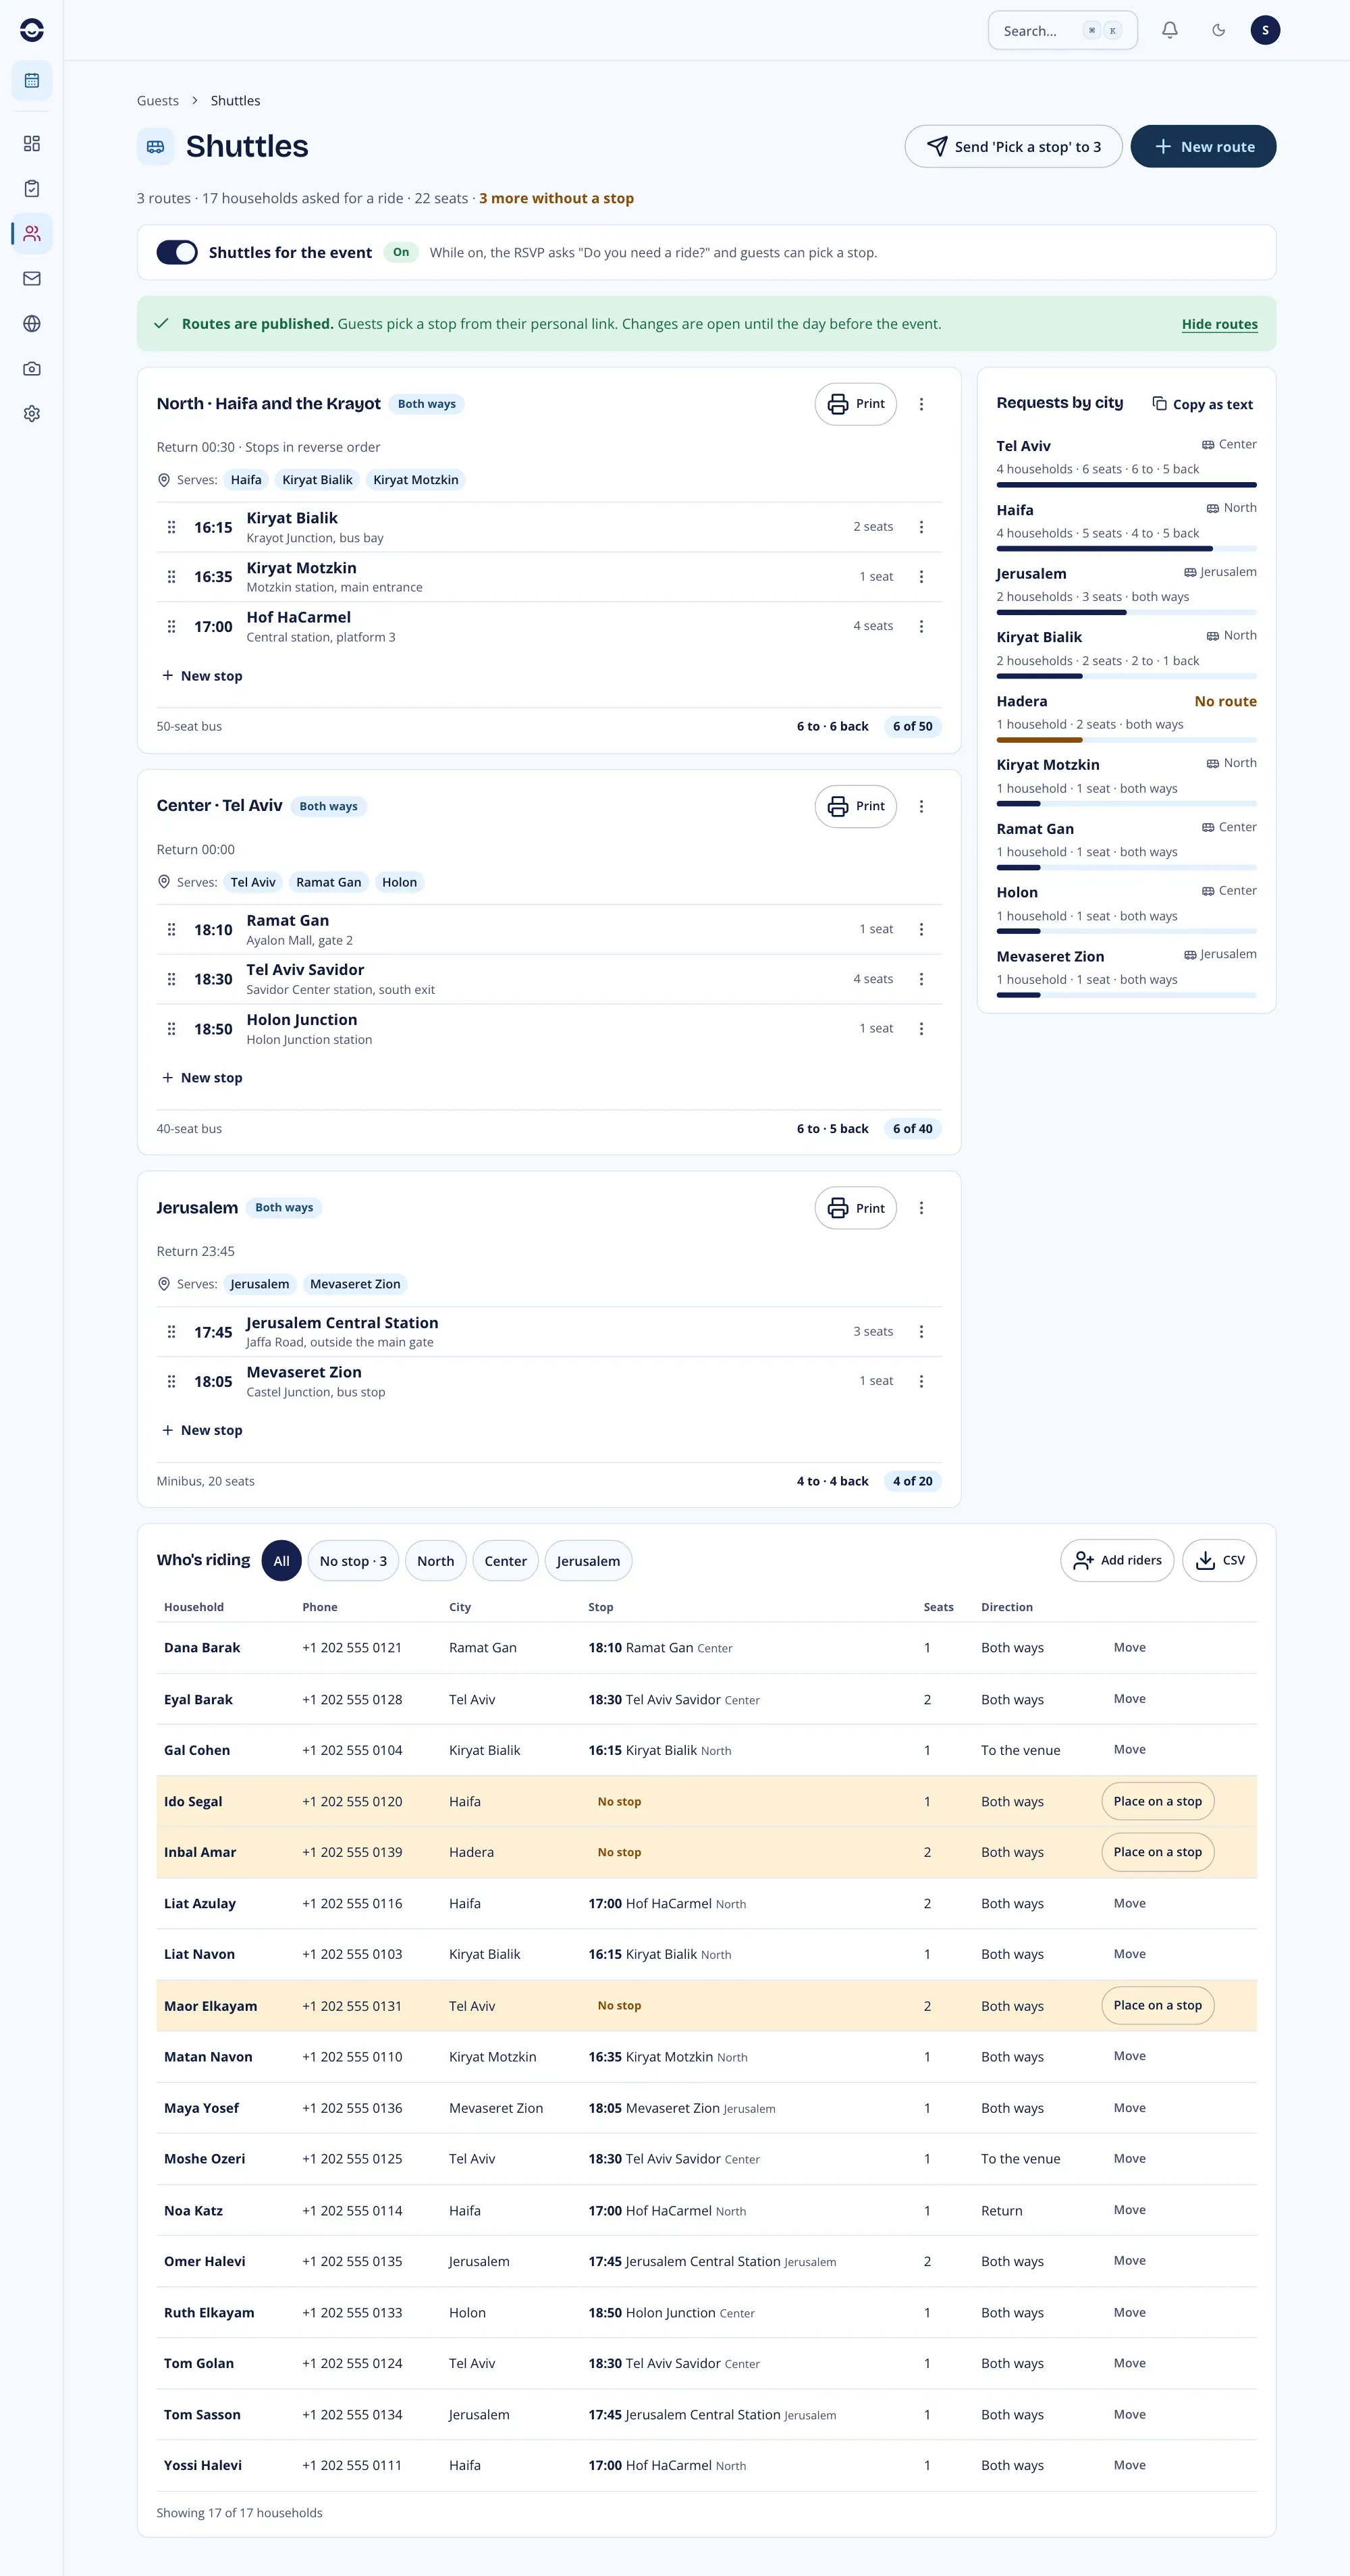
Shuttles helps you get guests to the event and back. The RSVP asks who needs a ride, from which city and how many seats. You build a route for each bus from those requests, publish it, and guests pick their stop from their personal link. Each bus gets a printable passenger list for the driver.
Open Guests > Shuttles in the sidebar. You can also get there from Settings > RSVP form with Go to shuttles, and from the shuttles card on Guests > Question answers.
Turn shuttles on
Section titled “Turn shuttles on”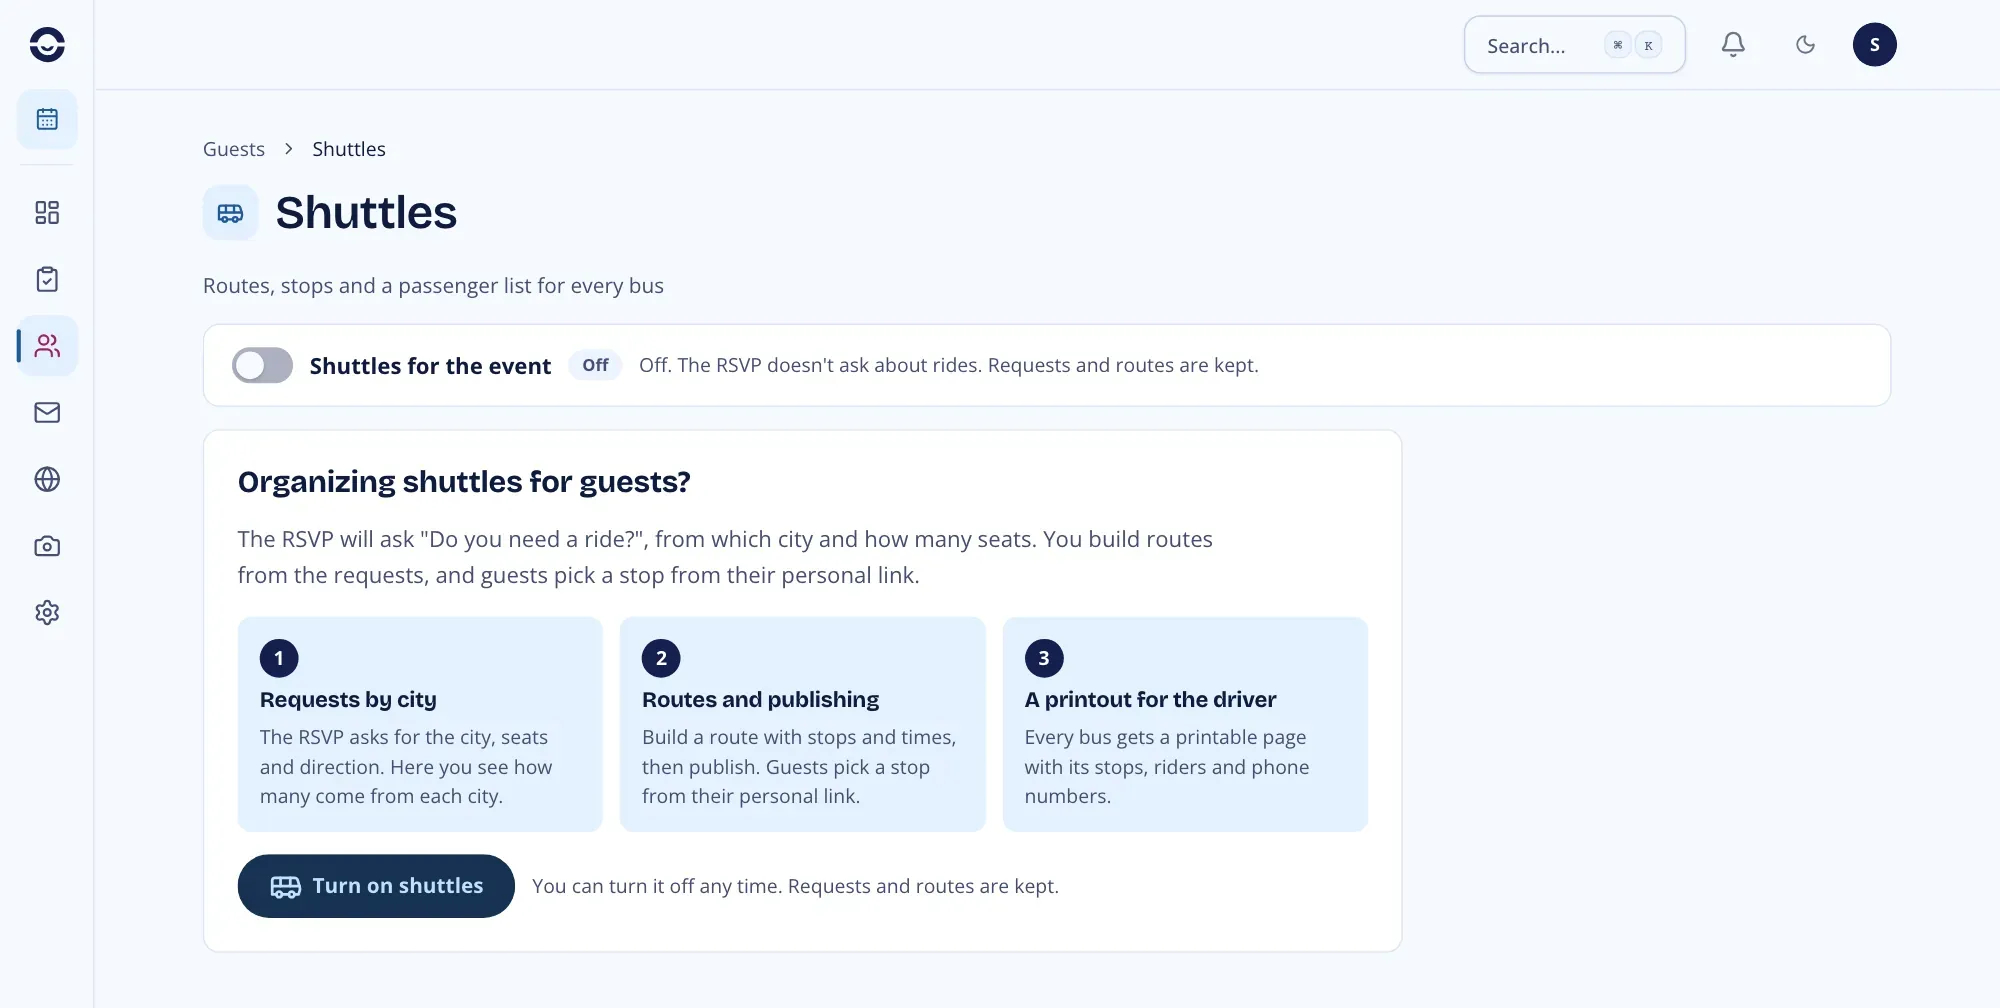
Click Turn on shuttles, or use the Shuttles for the event switch at the top of the page. The same switch is in Settings > RSVP form.
While it’s on, the RSVP asks Do you need a ride? Turning it off stops the question. The requests and routes you already have are kept, and come back when you turn shuttles on again.
The ride question is a built-in question. It shows in the Your own questions card with a Built-in tag and counts toward the 10 questions. If you already have 10, archive one before turning shuttles on. In its editor you choose which groups are asked. See Custom RSVP questions.
What the RSVP asks
Section titled “What the RSVP asks”Guests who say they’re coming see Do you need a ride? in the A few more questions step, once per household. If they answer Yes, we do:
- From which city?, with suggested cities. Before routes are published, this is how the request is saved.
- How many seats?, up to the number coming.
- Which way?: There, Back or There and back.
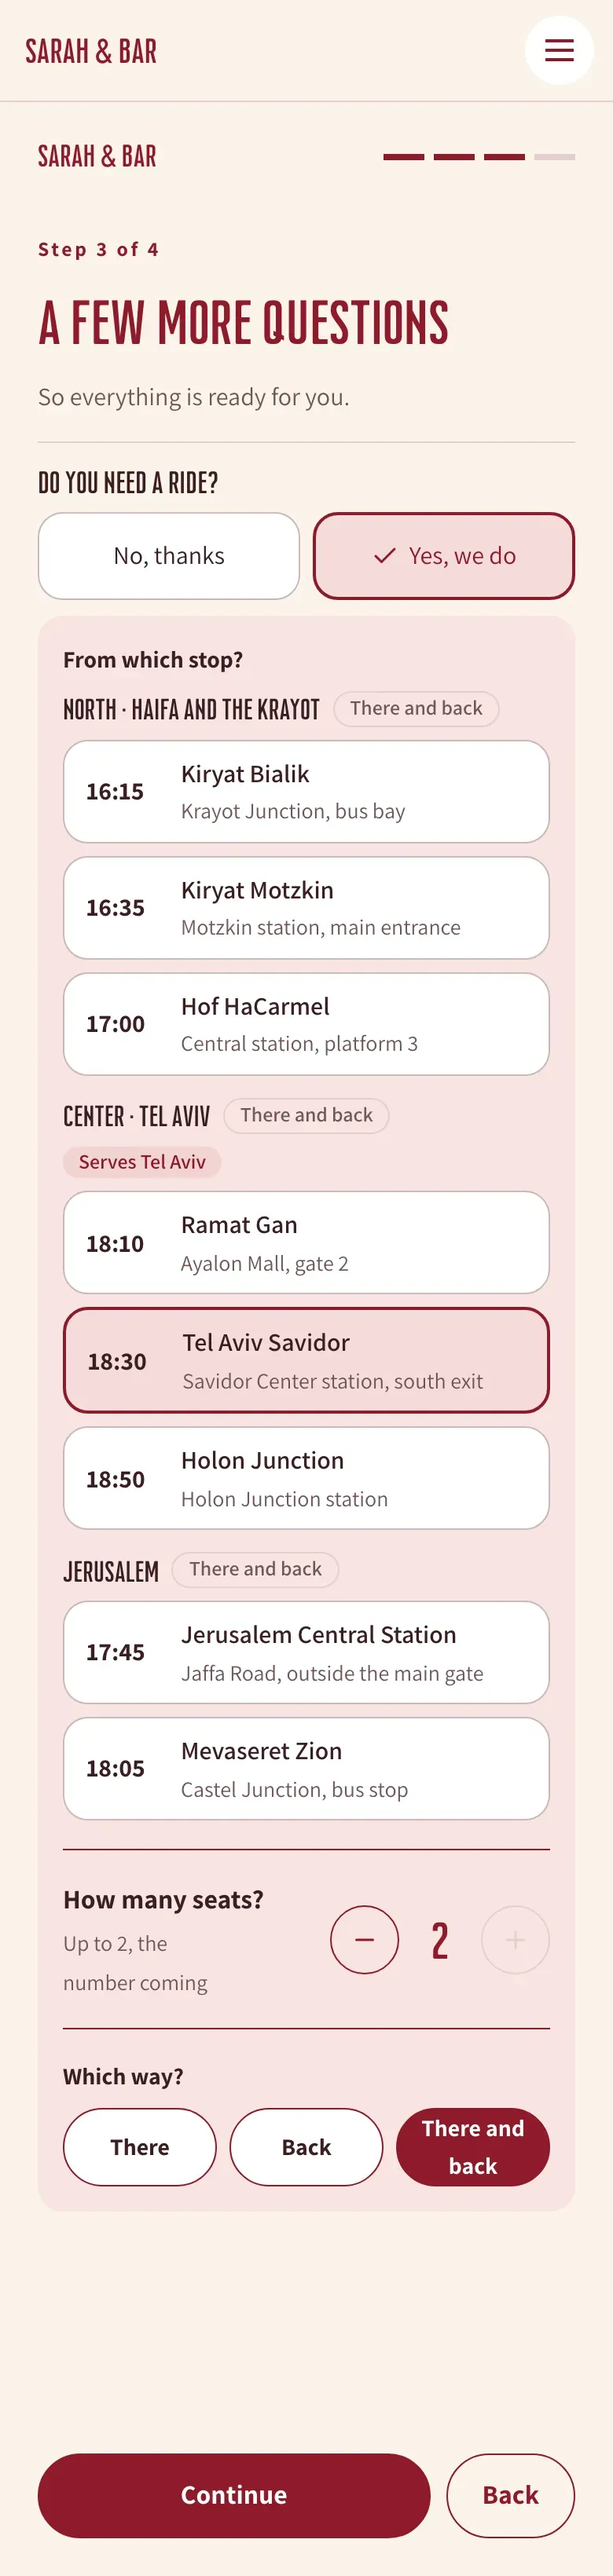
Once routes are published, the city question is replaced by From which stop?, and guests pick a stop on one of the routes.
Requests by city
Section titled “Requests by city”Requests by city shows how many households and seats asked for a ride from each city, biggest first, and which direction they need. Each city shows the route that serves it, or No route if none does yet. Copy as text copies the whole list, ready to paste into a message to the bus company.
The line under the page title adds it up: routes, households that asked for a ride, seats, and how many are still without a stop.
Build a route
Section titled “Build a route”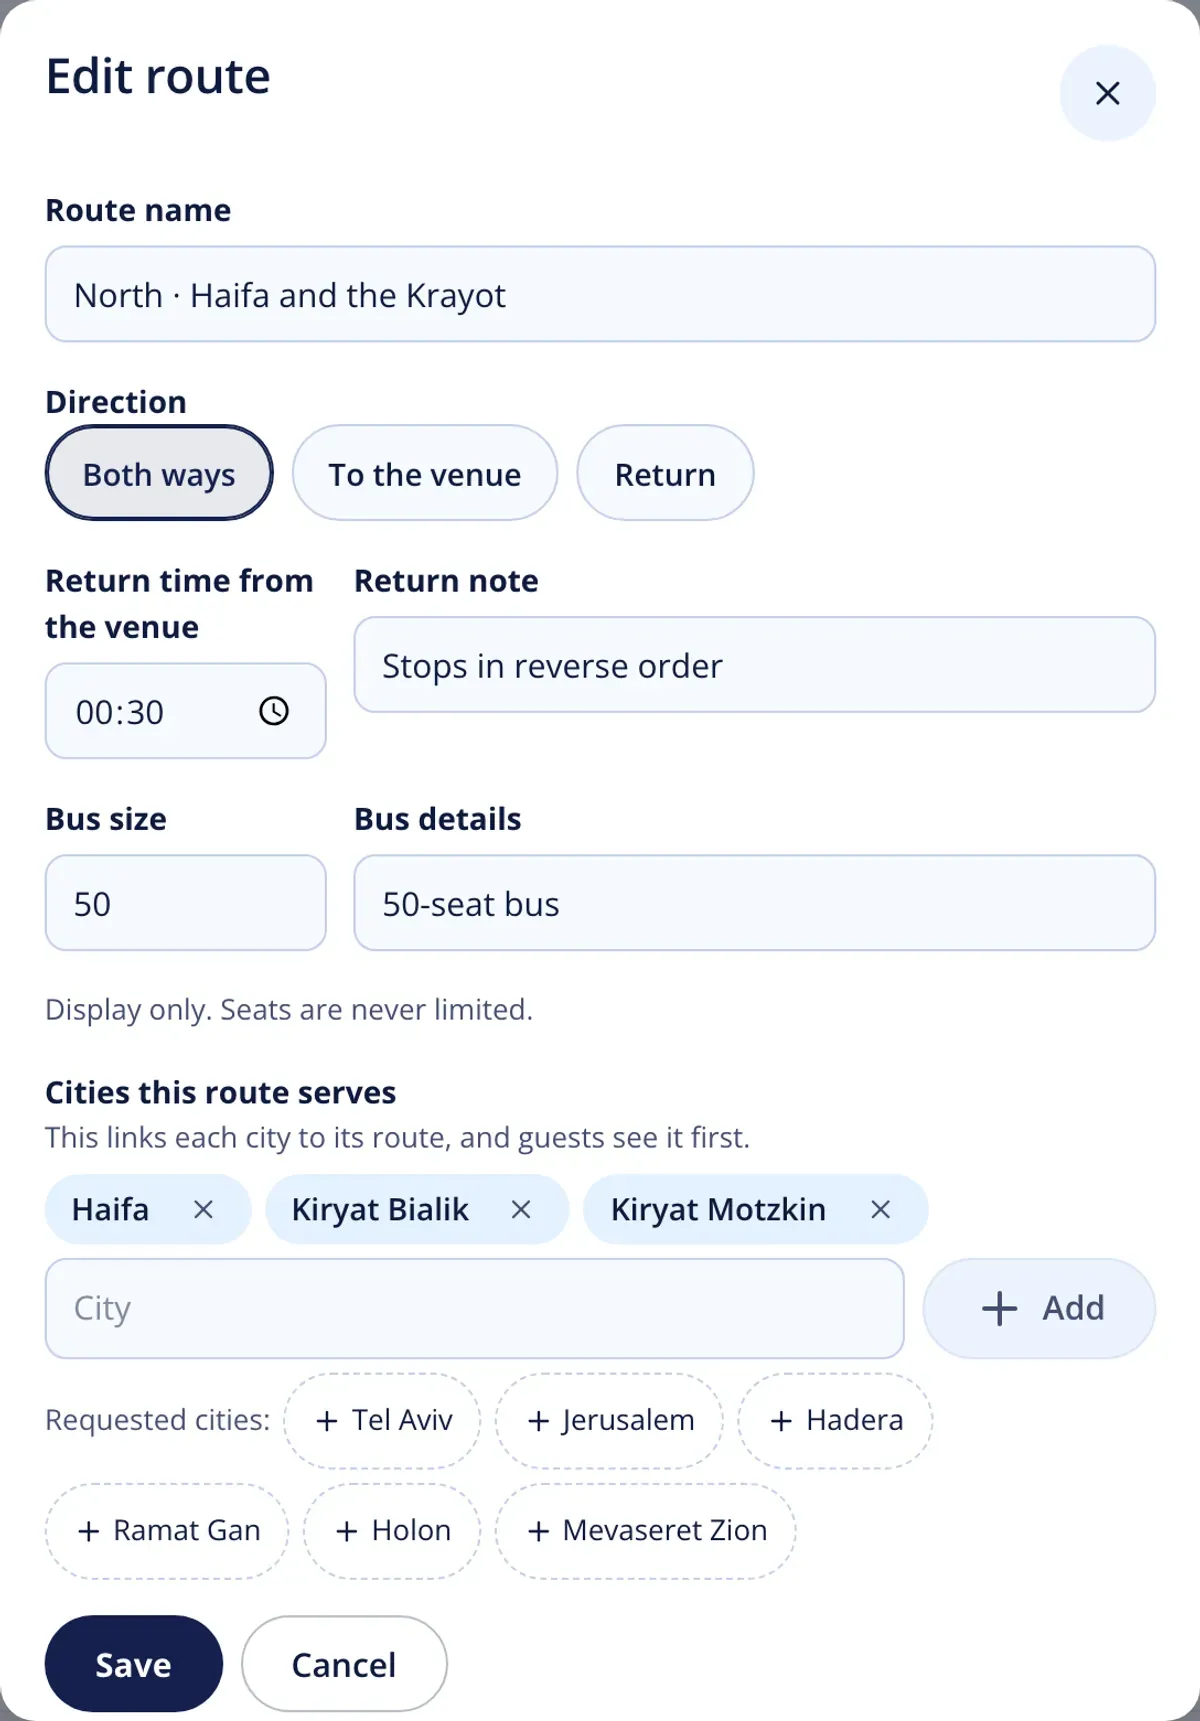
Click New route, or Edit route in a route’s ⋮ menu.
- Route name, for example “North · Haifa and the Krayot”. The part before the dot is used as the short name in filters and in requests by city.
- Direction: Both ways, To the venue or Return.
- Return time from the venue and Return note, for routes that come back.
- Bus size and Bus details: for your own reference. Seats are never limited. When more seats are booked than the bus size, the route card marks it.
- Cities this route serves: type a city and click Add, or click one of the Requested cities. This links each city to its route, and guests see that route first.
If a route already has riders booked on a direction you remove, move them to another route or change their direction first.
Delete route in the ⋮ menu deletes the route and its stops. Its riders stay on the list without a stop.
On a route card, click New stop and fill in Stop name, Pickup time and Address. Each stop shows how many seats are booked there, and the card footer shows the seats going to the venue and back.
Drag a stop to change the order, or use Move up and Move down in its ⋮ menu. Edit stop and Delete stop are in the same menu. Riders of a deleted stop stay on the list without a stop.
If you change the pickup time of a stop that has riders, you can click Send an update to the riders at this stop. It opens a message to them with the new time, ready to edit. Nothing is sent before you confirm.
Publish routes
Section titled “Publish routes”Routes stay hidden from guests until you click Publish routes. Publishing covers every route that has stops, including routes you add later. Once published:
- Guests pick a stop from their personal link, in the RSVP and on their page.
- They can change it until the day before the event.
Hide routes takes them off the guest side. Ride requests keep coming in through the RSVP.
Who’s riding
Section titled “Who’s riding”Who’s riding lists every household with a ride: phone, city, stop and time, seats and direction.
- Filter with All, No stop or a route. Households without a stop are highlighted.
- Place on a stop puts a household on a stop. Move changes its stop. In the same dialog you can change the city, seats and direction, choose No stop, or click Remove from shuttles.
- Add riders adds a household by hand: search by name or phone among the households that are coming, click Choose, set the stop, seats and direction, and click Add to shuttles.
- CSV downloads the list as it’s filtered, with the route, stop and pickup time of each household.
Remind guests to pick a stop
Section titled “Remind guests to pick a stop”When some households have no stop, the page shows Send ‘Pick a stop’ to N. It opens a message to Riders without a stop, with their personal link to pick a stop. You can edit it, and nothing is sent before you confirm.
Shuttle messages go out by SMS or email. While the audience is shuttle riders, the message editor also offers the Stop picker link variable, {{shuttleLink}}, which takes each guest to their own page.
The guest’s personal page
Section titled “The guest’s personal page”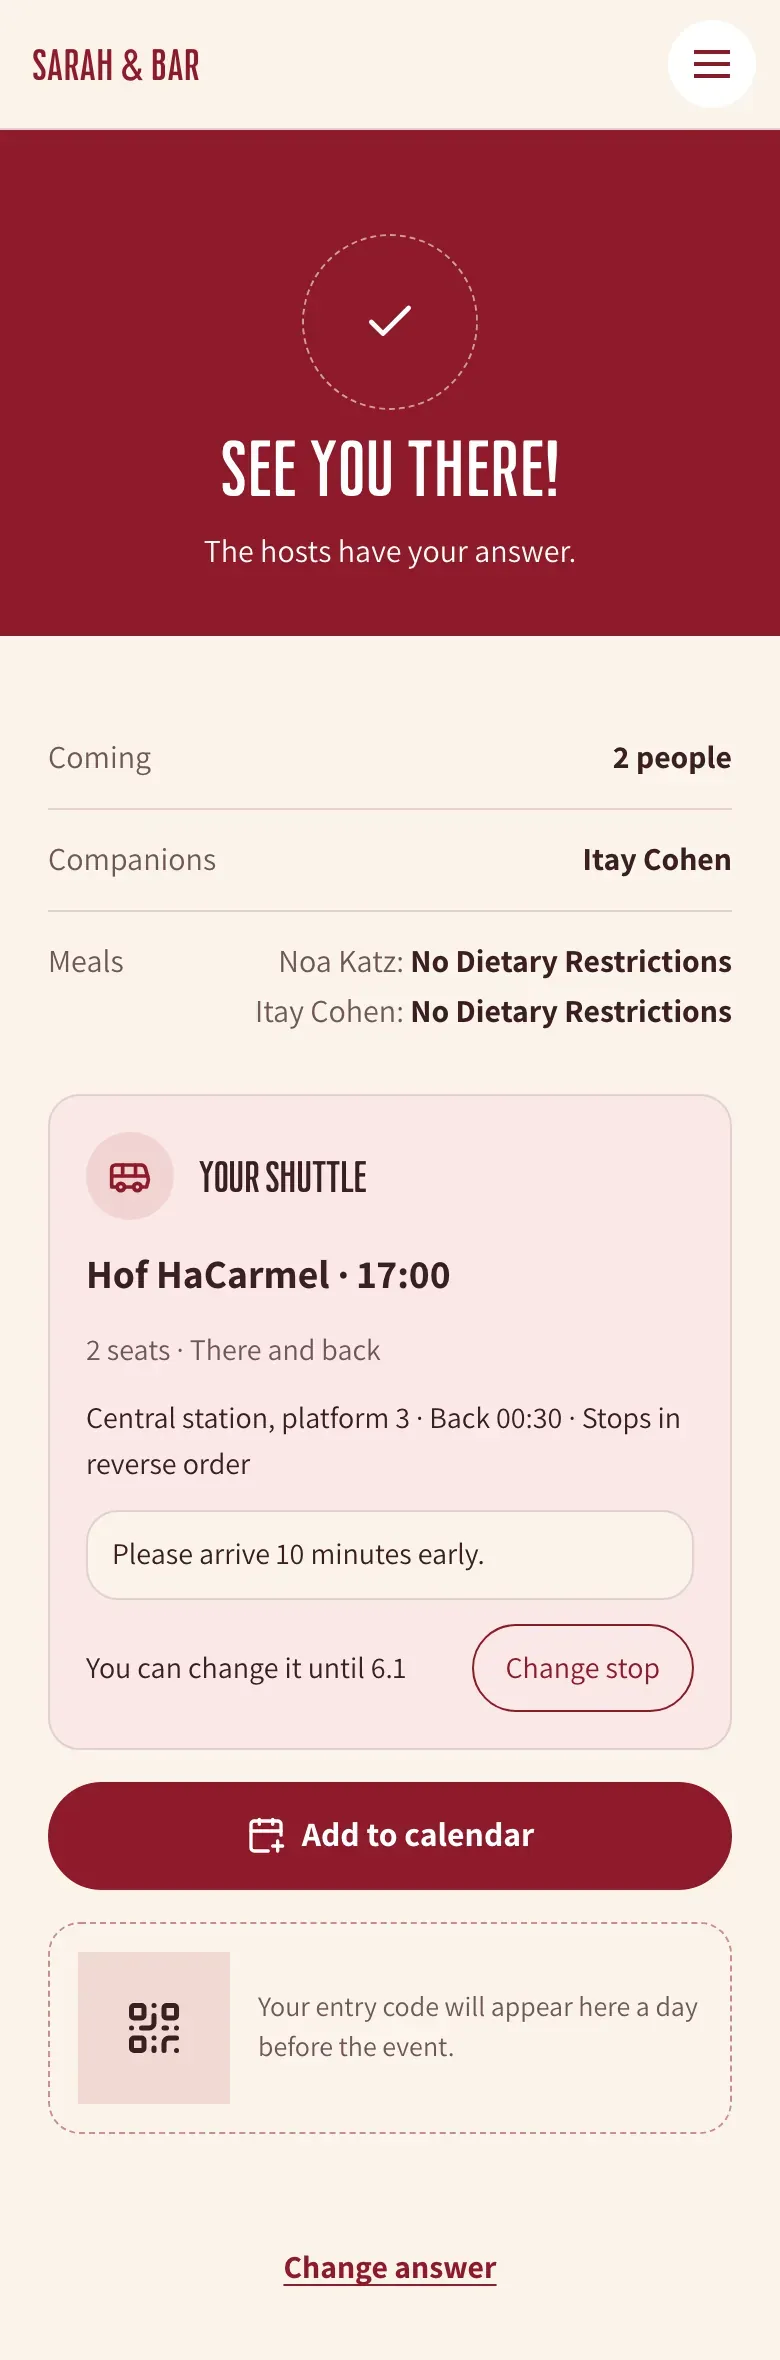
Guests who are coming see a Your shuttle card on their personal page:
- Before routes are published, it shows their request and says stops and times will show there once the routes are published.
- After publishing, a household without a ride can tap Need a ride? Pick a stop. A household with a request picks a stop and taps Confirm stop.
- With a stop picked, it shows the stop and time, seats and direction, the address and the return time, with Change stop until the day before the event.
From the start of the event day the list is closed. Guests can no longer pick or change a stop, and the card says so. You can still change everything on the Shuttles page.
The day-before message
Section titled “The day-before message”If a household has a stop, the day-before message adds a line with its ride: the stop and pickup time, and the return time and note when it rides back. This applies to The day before message and the Arrival details, day before automation, by SMS or email.
Print a route for the driver
Section titled “Print a route for the driver”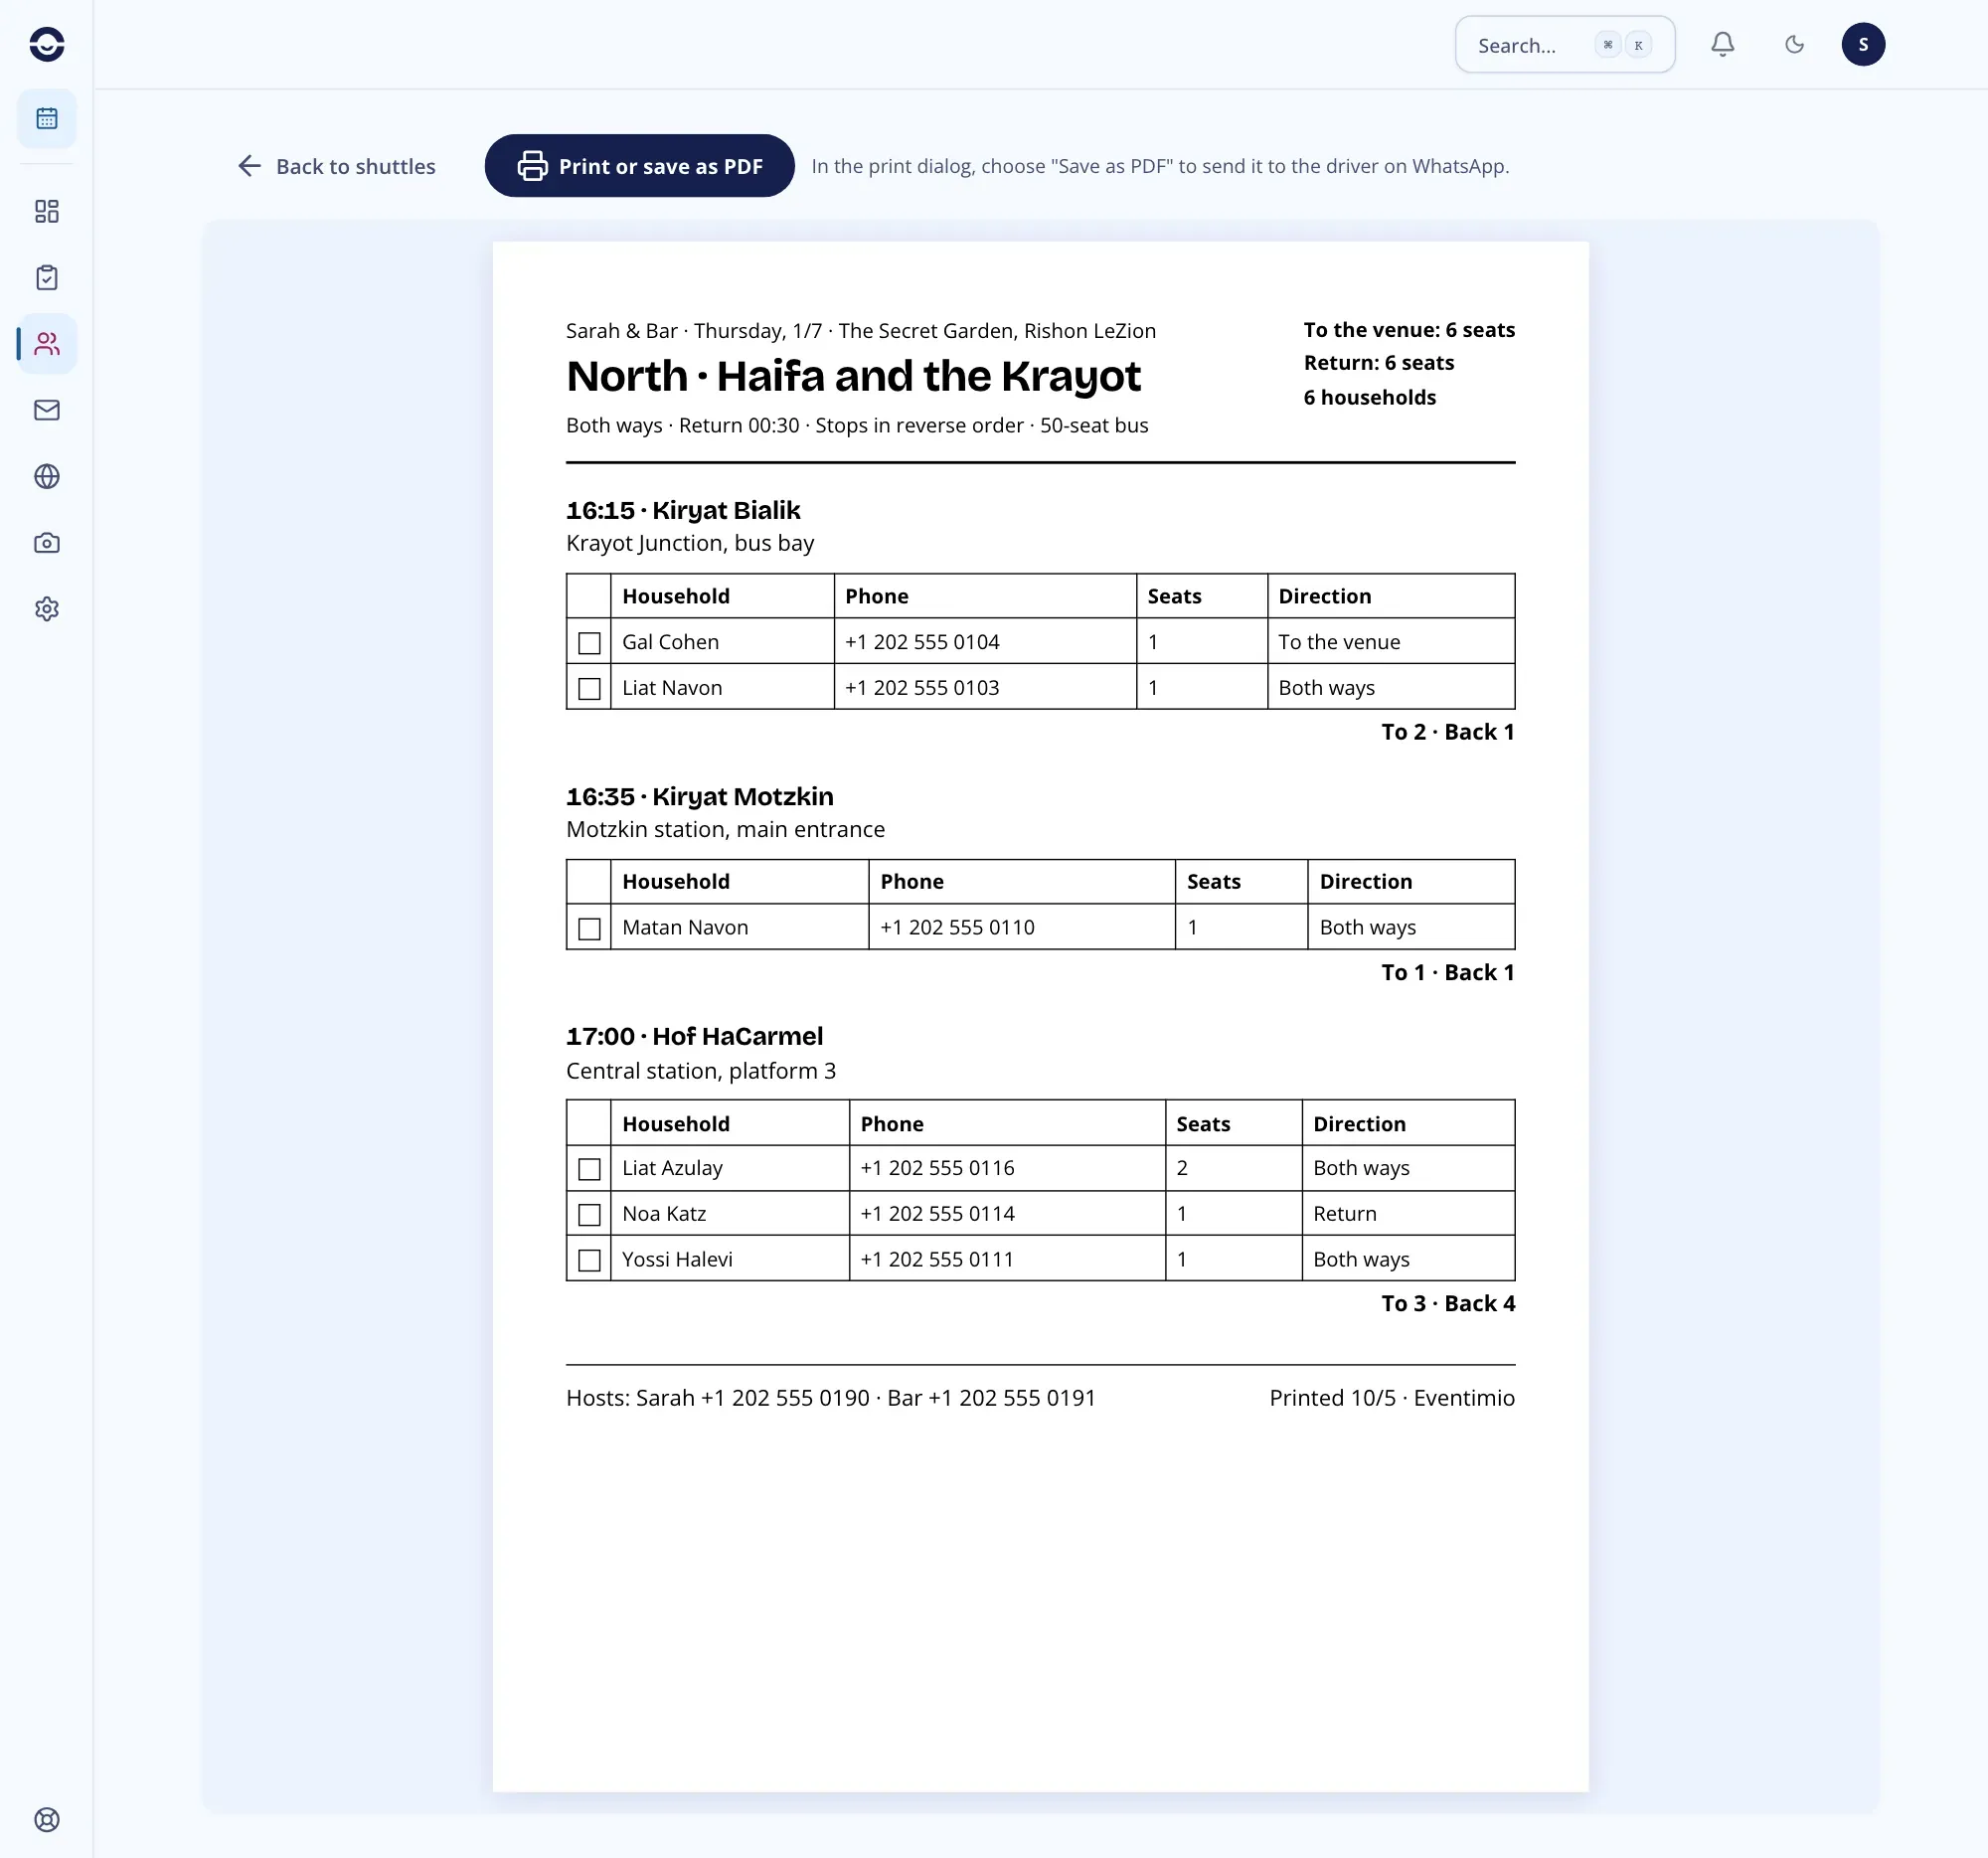
Click Print on a route card. The page shows the A4 printout:
- The event, date and venue, the route name, direction, return time, return note and bus details.
- Seats in each direction and the number of households.
- Each stop with its time and address, and a table of its riders: a tick box for boarding, household, phone, seats and direction, with the stop’s totals.
- The hosts’ phone numbers.
Only households placed on a stop are printed. Click Print or save as PDF. In the print dialog, choose “Save as PDF” to send it to the driver on WhatsApp.